What if you could turn your daily kitchen scraps into a powerful, nutrient-dense tonic that acts as both a premium fertilizer and a natural shield against plant diseases? For urban gardeners, indoor growers, and sustainability enthusiasts, this isn’t a far-off dream—it’s the reality of vermicomposting.
Often referred to by master gardeners as “Liquid Gold,” high-quality worm tea is one of the most effective, biologically active organic amendments you can introduce to your soil. Best of all, you don’t need expensive commercial setups to harvest it. With a simple, budget-friendly DIY worm bin, you can establish a closed-loop system right on your balcony, kitchen, or utility closet, transforming organic waste into pure ecological wealth.
This comprehensive guide breaks down the science of vermicompost extracts, exposes critical safety misconceptions, and provides a foolproof, step-by-step method to safely brew and apply your own liquid gold in just a few days.
Part 1: Deconstructing the “Liquid Gold” Mystery
Before gathering your materials, it is critical to understand exactly what worm tea is—and more importantly, what it isn’t. In the gardening world, there is a dangerous point of confusion regarding the liquid produced by worm bins.
The Critical Distinction: Leachate vs. Aerated Worm Tea
- Worm Bin Leachate (The Drain Water): This is the raw moisture that naturally condenses and trickles down through a worm bin, collecting at the very bottom tray. While many beginners mistakenly call this “worm tea,” raw leachate can be highly risky. Because it accumulates in a stagnant, oxygen-depleted environment, it can harbor anaerobic bacteria, harmful pathogens, and phytotoxins that can stress or burn delicate root systems. It should never be applied directly to house plants or sensitive crops without heavy dilution and aeration.
- Aerated Worm Compost Tea (AWT): True “liquid gold” is created intentionally. It is a aerobic brew made by steeping finished, high-quality worm castings (worm manure) in clean, oxygenated water, often paired with a food catalyst like organic molasses. The constant addition of oxygen multiplies billions of beneficial microorganisms—fungi, protozoa, and helpful bacteria—turning a handful of castings into a living, microscopic ecosystem.
When we talk about harvesting wealth from your bin, our ultimate goal is to use those rich, solid castings to brew a premium, perfectly aerated elixir.
Part 2: Setting Up Your Simple DIY Worm Bin
To get high-quality castings for your tea, you need a healthy, thriving worm ecosystem. You can build a highly efficient vertical multi-tier system using basic hardware store supplies for under $20.
Tools and Materials
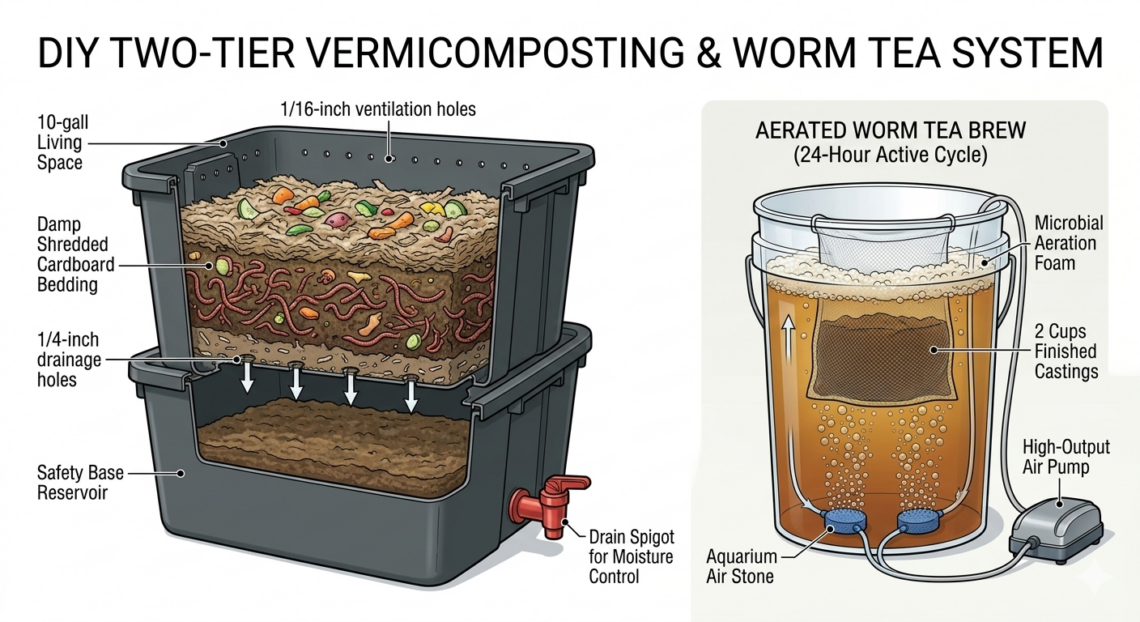
- Two 10-Gallon Plastic Storage Totes: Dark, opaque plastic containers are essential, as composting worms (such as Red Wigglers, Eisenia fetida) are strictly photophobic and thrive only in complete darkness.
- A Power Drill: Equipped with a 1/4-inch bit and a 1/16-inch bit.
- One Standard Plastic Spigot: To easily drain any excess moisture or managed leachate from the base tray.
- Bedding Material: Unbleached, shredded brown cardboard, clean coconut coir, or non-glossy shredded newspaper.
- The Workers: Approximately 1 pound of live Red Wiggler worms.
Step-by-Step Bin Construction
- The Liquid Base (Tote 2): Leave the bottom tote completely intact with no holes. Drill a single hole near the bottom edge of one short side and install your plastic spigot. This bottom tote acts exclusively as a safety reservoir to catch excess liquids and keep the living area from drowning.
- The Living Space (Tote 1): Take the second tote and drill 1/4-inch drainage holes spaced 2 inches apart across the entire bottom surface. Next, drill a neat row of smaller 1/16-inch ventilation holes around the upper rim just below the lid handle line.
- The Nesting: Nest Tote 1 directly inside Tote 2. The drainage holes will allow excess moisture to drop safely into the base reservoir, keeping the upper chamber perfectly managed.
- Preparing the Bedding: Soak your shredded cardboard or coconut coir in water until it reaches the consistency of a wrung-out sponge. Fill Tote 1 about halfway with this damp, fluffy bedding.
- Introduce the Worms: Gently place your Red Wigglers onto the bedding. Leave the lid off under a bright room light for the first hour; this coaxes them to dive deep down into their new home. Once settled, add a handful of fruit and vegetable scraps, then pop the lid on.
Part 3: The Golden Recipe for Aerated Worm Tea
Once your bin has been running smoothly for a few months, the bottom of the living chamber will accumulate deep, rich, black, soil-like worm castings. Now you’re ready to extract the liquid gold.
The Brewing Equipment
- 1 Five-Gallon Bucket: Completely clean and free of chemical residues.
- An Aquarium Air Pump: High-output, ideally with two ports and attached flexible hosing.
- 2 Air Stones: To create a continuous, rolling bubble effect that maximizes dissolved oxygen.
- 1 Fine Mesh Strainer Bag: A 400-micron brewing bag or a clean pair of nylon stockings.
- 2 Cups of Finished Worm Castings: Sifted gently from your DIY bin.
- 1 Tablespoon of Unsulfured Organic Molasses: This acts as a vital carbohydrate fuel source to rapidly kickstart bacterial reproduction.
The Step-by-Step Brew Process
- Dechlorinate Your Water: Fill your 5-gallon bucket with standard tap water. Chlorinated city water will instantly sanitize and kill the very microbes you are trying to cultivate. Drop your air stones into the water, plug in the air pump, and let it bubble uncovered for a full 24 hours to completely dissipate any chlorine or chloramines.
- Bag the Castings: Place your 2 cups of rich worm castings into the mesh bag or nylon stocking, tying it off securely.
- The Catalyst: Add the tablespoon of unsulfured molasses directly into the water and stir until fully dissolved.
- Submerge and Bubble: Suspend the castings bag directly in the center of the bucket. Position your air stones right underneath or inside the bag if possible. The goal is a vigorous, violent bubble effect that physically strips the beneficial microbes off the solid surfaces of the castings and suspends them into the liquid.
- The 24-Hour Sweet Spot: Let the mixture bubble continuously for 24 to 48 hours in a cool, shaded environment out of direct sunlight. A healthy, fully active brew will develop a thick, frothy head of foam on the surface and emit a rich, sweet, deeply earthy aroma like a pristine forest floor after a rainstorm.
⚠️ CRITICAL NOTE: If the mixture ever develops a sour, rotten, or putrid smell during brewing, the system has gone anaerobic (oxygen-depleted). Discard it immediately away from your plants, clean the equipment thoroughly, and start over with higher airflow.
Part 4: Safe and Effective Application Methods
True aerated worm tea must be used immediately. Because the microbial population consumes dissolved oxygen at an astronomical rate, you must apply your liquid gold within 4 to 6 hours of turning off the aquarium pump.
| Application Method | Best Used For | Dilution Ratio (Tea to Water) | Key Benefit |
| Root Drench | Potted houseplants, container gardens, ornamental shrubs, raised vegetable beds. | 1:1 or Undiluted | Packs the root zone with structural microbial life, making nutrients highly bioavailable. |
| Foliar Spray | Roses, fruit trees, tomatoes, or ornamental foliage showing signs of mild stress. | 1:2 (Filter through fine cloth first) | Colonizes the leaf surfaces with good bacteria, crowding out pathogenic fungal spores like powdery mildew. |
Part 5: Ongoing System Maintenance
Maintaining your closed-loop wealth generator takes less than ten minutes a week:
- The Food Diet: Feed your worms balanced, non-acidic kitchen scraps. They love coffee grounds, melon rinds, banana peels, and eggshells. Avoid dairy, meat, oils, garlic, onions, and heavy citrus fruits, which disrupt the bin’s delicate pH and create foul odors.
- Moisture Audits: Every time you feed, check the moisture balance. If the bedding feels dry, spritz it with a misting bottle. If it looks soggy or swampy, immediately mix in dry, shredded cardboard to absorb the excess water and prevent stagnant pooling in the base.
- Spigot Management: Keep your bottom spigot cracked open slightly with a collection jar beneath it to ensure no stray liquid pools inside the base tote for more than 24 hours.
By honoring these simple biological rules, your simple DIY setup will consistently convert household organic waste into a reliable, endless supply of living, liquid wealth for your garden.