The excitement of booking a two-week summer getaway is unmatched, but for plant parents and urban gardeners, that joy is often shadowed by a lingering sense of dread. You can pack your bags, but your mind remains trapped at home, worrying about your thriving tomato plants, delicate monsteras, and prized herbs. Leaving your green sanctuary unattended usually means choosing between two sub-optimal options: bothering a neighbor who might overwater them to death, or coming back to a collection of brittle, brown stalks.
Fortunately, there is a simple, highly efficient engineering solution that commercial growers have used for decades, and you can build it at home for just a few dollars: Sub-Irrigated Planters (SIPs). Commonly referred to as self-watering planters, SIPs revolutionize container gardening by turning traditional plant care upside down—literally. Instead of watering your plants from above and guessing how much moisture the soil needs, sub-irrigation delivers water directly to the root zone from a built-in reservoir beneath the soil.
This comprehensive guide will unpack the science behind sub-irrigation, explain why it actively prevents the most common gardening mistakes, and provide a step-by-step blueprint to construct your own heavy-duty, vacation-proof SIP system using easily accessible materials.
The Science of Sub-Irrigation: How SIPs Work
To understand why sub-irrigated planters are so effective, we have to look at how plants drink in nature. When you water a standard pot from the top, gravity forces the water down through the soil. Much of it escapes through the bottom drainage holes, washing away vital nutrients, while the top layer of soil becomes a compacted, muddy mess that suffocates delicate root hairs. When the soil dries, it shrinks, creating gaps where future water simply runs down the sides without hydrating the plant.
SIPs bypass this erratic cycle entirely by utilizing two fundamental principles of physics and biology: capillary action and perpendicular root respiration.
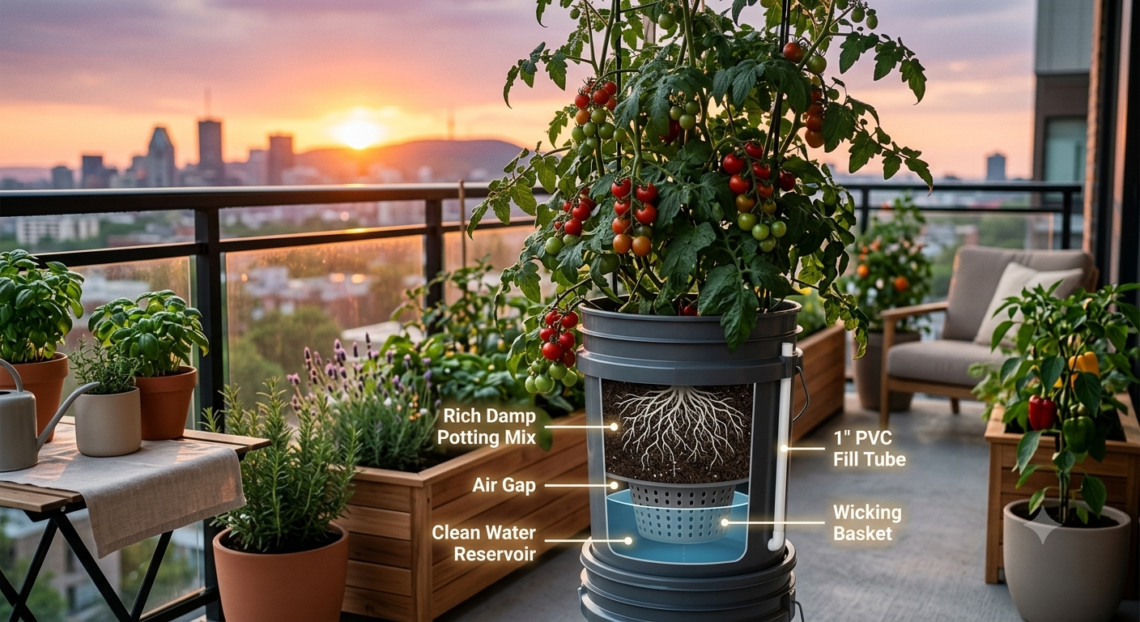
- Capillary Action (The Wicking Effect): Think of how a dry sponge instantly sucks up a spill from a kitchen counter. Soil operates the same way. In a SIP system, the soil sits on a perforated platform suspended just above a water reservoir. A “wicking column”—a small perforated cup packed tightly with soil—extends from the soil layer down into the water. As the roots absorb moisture from the upper soil, capillary action naturally draws water upward from the reservoir through the wicking column, maintaining a perfectly uniform, damp-but-not-soggy moisture level at all times.
- Perpendicular Root Respiration: One of the biggest paradoxes of plant care is that overwatering actually drowns a plant. Plant roots need oxygen just as much as they need water. In a standard pot, waterlogged soil fills the tiny air pockets, leading to anaerobic conditions and root rot. In a SIP, because the water table is separated from the soil mass by an air gap, the roots can access an abundant supply of both oxygen and moisture simultaneously.
Why SIPs are the Ultimate Vacation Survival Tool
If you are planning to leave your home for 10 to 14 days, traditional watering tricks simply won’t cut it. Grouping plants together or using upside-down wine bottles usually runs dry within 72 hours.
SIPs are uniquely designed to handle extended absences for several key reasons:
- Evaporation Shielding: Because the water reservoir is completely enclosed underneath the soil and covered at the top with a mulch layer or plastic barrier, there is almost zero moisture loss due to surface evaporation. Every single drop of water in the reservoir is saved exclusively for the plant’s consumption.
- Self-Regulating Efficiency: Plants drink only what they need based on temperature and sunlight. On hot, breezy days, the capillary draw increases; on cooler days, it slows down. The system automatically adjusts itself without any mechanical timers, electronics, or human intervention.
- Massive Water Capacity: A typical 5-gallon DIY planter can hold over a gallon of water in its lower reservoir. For most medium-sized vegetables or house plants, this volume provides a steady, uninterrupted supply of hydration for 14 to 21 days easily.
Step-by-Step Guide: How to Build a Heavy-Duty DIY SIP
Building your own sub-irrigated planter is an incredibly rewarding afternoon project. While commercial self-watering pots are expensive and often feature small, inadequate reservoirs, this DIY 5-gallon version is robust, highly customizable, and costs less than $10 to make.
Materials Needed:
- Two 5-Gallon Plastic Buckets: Ensure they are food-grade if you plan on growing edible vegetables or herbs.
- One 16-Ounce Plastic Cup: This will serve as the wicking basket (sour cream containers or heavy-duty deli cups work perfectly).
- One Piece of 1-Inch PVC Pipe: Cut to a length roughly 4 inches taller than the height of the two stacked buckets. This is your fill tube.
- High-Quality Potting Mix: Crucial Note: Do not use heavy topsoil or garden soil. You need a lightweight, peat-moss or coco-coir based potting mix mixed with perlite to ensure proper wicking.
- Tools: A drill with a 1/4-inch bit and a 1-inch spade bit (or a utility knife/hole saw).
Construction Blueprint:
Step 1: Preparing the Inner Bucket (The Soil Chamber)
Take one of the 5-gallon buckets—this will be your top bucket holding the plant and soil. Turn it upside down and drill dozens of 1/4-inch holes across the entire bottom surface. These holes provide essential aeration for the roots.
Next, using a hole saw or utility knife, cut a large circle exactly in the center of the bottom. This circle must match the diameter of the rim of your 1-ounce plastic cup. Finally, cut a 1-inch hole near the outer edge of the bottom for the PVC fill tube to slide through.
Step 2: Creating the Wicking Basket
Take your plastic cup and drill dozens of small 1/8-inch holes all around its sides and bottom. Insert the cup downward into the large central hole you cut in the inner bucket. The lip of the cup should catch on the bottom of the bucket, suspending it downward. This cup will act as the structural bridge that sits directly inside the water reservoir.
Step 3: Setting Up the Outer Bucket (The Reservoir)
Take the second 5-gallon bucket—this is your base reservoir. Insert the first bucket inside it. Look at where the bottom of the top bucket rests inside the bottom bucket. Typically, there will be a 3-to-4-inch gap.
Take the inner bucket back out. On the outside of the reservoir bucket, drill a single 1/2-inch hole roughly 1/2-inch below where the bottom of the top bucket would rest. This is your overflow drain. It ensures that if a heavy rainstorm hits or you overfill the tube, excess water drains out safely, preserving the vital air gap between the reservoir and the soil.
Step 4: Assembly and Filling
Place the inner bucket back inside the reservoir bucket permanently. Insert the 1-inch PVC pipe through the side hole down into the very bottom of the reservoir. Cut the bottom of the PVC pipe at a 45-degree angle so water can flow out freely when you fill it.
Now, pack the wicking cup tightly with your lightweight potting mix. This step is critical: the soil must be firmly compressed inside the cup to create a solid capillary connection. Once the cup is packed, fill the rest of the bucket with loose potting mix, adding your organic fertilizer as you go.
Step 5: Prime the System
Water the planter thoroughly from the top just this once. This moistens the potting soil and initiates the wicking cycle. Afterward, pour water directly down the PVC pipe until you see it trickling out of the overflow drain hole on the side. Your reservoir is now completely full and operational.
Conclusion
Investing a few minutes into building sub-irrigated planters is the ultimate insurance policy for your green spaces. By working alongside natural physics rather than fighting against evaporation and gravity, SIPs give you the freedom to travel the world without a shred of plant-related anxiety. Pack your bags, enjoy your two-week vacation, and rest easy knowing that your garden has everything it needs to thrive independently until the day you return.


