As the peak of summer arrives, backyard gardens and local farmers’ markets overflow with an abundance of vibrant, sun-ripened fruits. From deep red strawberries and juicy peaches to plump tomatoes and sweet berries, the season offers a sensory explosion of flavors. However, this period of abundance is famously fleeting. Before you know it, the harvest begins to soften, leaving modern homesteaders and eco-conscious individuals with a timeless dilemma: how do we extend the taste of summer long after the warm days have faded?
While modern freezing and electric dehydrating are popular methods, they come with a continuous energy cost. Enter solar dehydrating—a traditional, zero-electricity, and deeply rewarding method of food preservation that harnesses the raw, clean power of the sun. By building a simple DIY sun-oven, you can transform fresh, perishable fruits into shelf-stable, nutrient-dense snacks using nothing but direct sunlight and basic airflow dynamics.
This comprehensive guide will walk you through the science of solar drying, a step-by-step blueprint to build your own high-efficiency sun-oven, and the best practices for preparing and storing your summer fruit peak.
The Science Behind Solar Dehydration
Before picking up your tools, it is crucial to understand that solar dehydration is not just about making things hot. In fact, excessive, stagnant heat will literally cook your fruit instead of drying it, ruining its texture and degrading its nutritional value. True dehydration relies on a delicate balance of three interconnected factors: heat, air circulation, and moisture removal.
- Controlled Heat (The Greenhouse Effect): The ideal temperature range for drying most fruits is between 130°F and 160°F (54°C to 71°C). A well-designed sun-oven uses a clear glass or plastic cover to trap solar radiation, creating a localized greenhouse effect that gently warms the internal air.
- Convection and Air Circulation: As the air inside the box heats up, it naturally expands and rises. To prevent moisture from turning into stagnant steam, your sun-oven must feature strategically placed intake vents at the bottom and exhaust vents at the top. This creates a continuous, natural chimney effect that draws fresh, dry air over the food.
- Relative Humidity Drop: Warm air can hold significantly more moisture than cold air. As the circulating air heats up inside the solar oven, its relative humidity drops drastically. This sudden dryness forces the water inside the sliced fruit to evaporate rapidly into the passing air stream, which then exits through the top vents.
By mastering this passive thermodynamic cycle, your homemade sun-oven can dry food just as fast as an electric appliance, completely off the grid.
Step-by-Step Blueprint: Building a Simple DIY Sun-Oven
You do not need an engineering degree or expensive materials to build an efficient solar food dehydrator. Most of the components can be sourced from scrap wood, recycled glass windows, or local hardware stores.
Materials Needed:
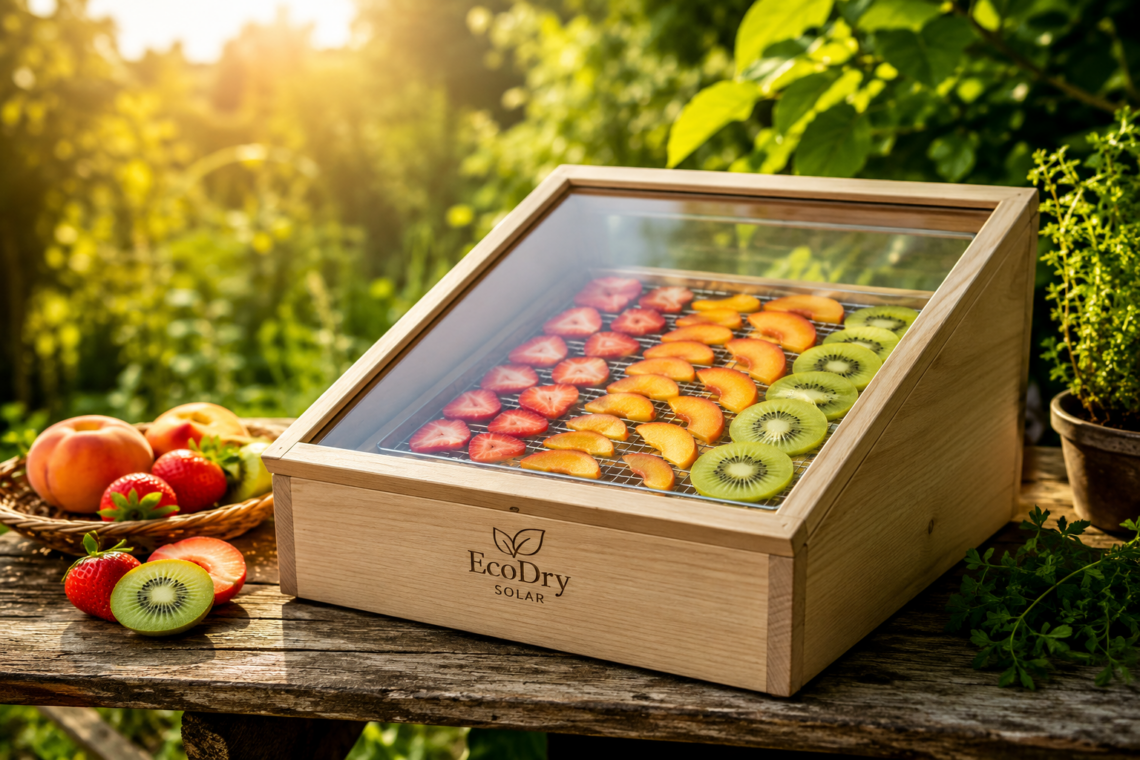
- The Outer Shell: A sturdy wooden box (approximately 2 feet wide by 3 feet long, with a depth of 8 to 12 inches). You can build this easily using Baltic birch plywood or repurposed wooden shipping crates.
- Glazing/Cover: A sheet of clear, tempered glass or heavy-duty UV-resistant plexiglass that fits snugly over the top opening of the box.
- Absorber Plate: Sheet metal painted with non-toxic, matte black heat-resistant paint (this turns light into raw thermal energy).
- Drying Racks: Food-grade, chemical-free mesh screen (avoid galvanized or aluminum screens, as they can leach toxins into acidic fruits; food-grade nylon, stainless steel, or cheesecloth over wooden frames work perfectly).
- Ventilation Controls: Fine mesh window screening to cover the intake and exhaust holes, keeping flies, wasps, and ants completely out of your food.
- Hardware: Screws, wood glue, heavy-duty hinges for the glass cover, and a support prop stick to angle the box toward the sun.
Construction Steps:
Step 1: Preparing and Insulating the Box
Start by assembling your wooden box. To maximize efficiency during late summer when ambient temperatures begin to fluctuate, consider insulating the interior walls. Line the bottom and sides of the wooden shell with a thin layer of natural cork or foil-faced rigid foam insulation.
Step 2: Installing the Absorber Plate
Cut your sheet metal to match the interior dimensions of the bottom of the box. Paint it entirely with flat, non-toxic black paint. Once dry, place it directly over the insulation layer. This black plate will absorb the solar rays entering through the glass and radiate steady heat throughout the chamber.
Step 3: Drilling the Convection Vents
Using a hole saw or spade drill bit, create three 1-inch holes along the bottom front panel of the box (the air intake). Next, drill three identical holes along the top back panel (the air exhaust). Staple the fine window mesh over these holes from the inside. This ensures a clean environment where air flows freely but insects are completely barred from entry.
Step 4: Mounting the Drying Trays
Attach thin wooden rails or cleat strips along the inside left and right walls of the box. Position them at least 3 to 4 inches above the black absorber plate to ensure air flows seamlessly underneath the food. Slide your custom-built mesh trays onto these rails.
Step 5: Attaching the Glazing Cover
Secure your glass or plexiglass sheet to the top frame of the box using heavy-duty door hinges. Apply a thin strip of weather stripping around the wooden rim where the glass rests. This forms an airtight seal when closed, preventing precious heat from escaping anywhere except through the designated upper exhaust vents.
Preparing Your Summer Fruit Peak for the Sun
Once your sun-oven is built, tested, and angled directly toward the mid-day sun, it is time to prepare your harvest. Proper preparation directly determines the shelf life and overall safety of your dried goods.
- Selection: Choose fruit that is at the absolute peak of its ripeness. Under-ripe fruit lacks sweetness and flavor concentration, while over-ripe fruit can become excessively mushy and take twice as long to dry, increasing the risk of mold growth during the initial hours.
- Uniform Slicing: Consistency is paramount. Use a sharp mandoline or a steady chef’s knife to slice fruits into uniform thicknesses (ideally between 1/4 and 1/8 of an inch). If your slices vary wildly in size, some pieces will case-harden (dry on the outside while remaining wet inside) while others turn into brittle chips.
- Pre-treatment (Optional but Recommended): Light-colored fruits like apples, peaches, and bananas naturally oxidize and turn brown when exposed to air. To preserve their brilliant, natural summer colors, dip the freshly cut slices into a solution of equal parts lemon juice and water for 5 minutes before laying them out.
- Arrangement: Lay the prepared fruit slices onto your food-grade mesh trays in a single, uncrowded layer. Ensure none of the pieces are overlapping. Overlapping blocks air circulation, creating pockets of localized humidity that severely slow down the drying cycle.
Managing the Drying Cycle and Testing for Doneness
Solar dehydrating is an active, mindful process. Unlike an electric dehydrator that you can plug in and walk away from for 24 hours, a sun-oven requires you to work in harmony with the daily path of the sun.
Place your sun-oven in an open area completely free from afternoon shadows cast by trees, fences, or buildings. Every two to three hours, gently rotate the box horizontally to ensure the glass face tracks the sun’s position across the sky. On a clear, low-humidity summer day with ambient temperatures above 85°F (29°C), a single batch of thin fruit slices can be fully dehydrated in 8 to 12 hours.
How to Test for Absolute Doneness:
Never rely purely on visual inspection. Take a few sample slices from different areas of the tray and let them cool down to room temperature for 10 minutes (warm fruit always feels softer than it actually is).
- The Squeeze Test: Squeeze the fruit firmly between your fingers. It should feel leathery, pliable, and completely non-sticky.
- The Tear Test: Tear a piece in half. Examine the inner seam closely; there should be absolutely no visible beads of moisture or damp pockets remaining. If it feels spongy or wet, it needs to go back into the sun-oven immediately.
Conditioning and Long-Term Storage
Even when a batch of fruit feels perfectly dry, there can still be microscopic variances in moisture levels between individual slices. To prevent mold outbreaks during long-term winter storage, you must perform a process known as conditioning.
- The Glass Jar Method: Pack your cooled, dried fruit loosely into clean, clear glass Mason jars. Seal the lids tightly and store them in a visible spot on your kitchen counter for 7 to 10 days.
- Daily Inspection: Once a day, give the jars a gentle shake. Look closely at the interior surface of the glass. If you notice any condensation forming on the walls of the jar, or if the fruit slices begin sticking together in clumps, it means the batch still holds too much internal moisture. Empty the jars back onto the drying trays and give them another half-day in the sun-oven.
- Final Storage: If no condensation appears after a week, your fruit is perfectly conditioned. Move the jars to a cool, dark, and dry pantry. Kept away from direct light and heat spikes, your solar-dehydrated summer harvest will retain its flavor, vitamins, and vibrant colors for up to a full year.
Conclusion
Building and using a simple sun-oven is more than just a functional way to preserve food—it is a practical, intentional step toward a more self-reliant and sustainable lifestyle. By utilizing raw solar energy to extend the shelf life of your peak summer fruits, you cut down on household energy consumption, eliminate food waste, and create a pantry stocked with delicious, wholesome treats free from artificial preservatives. This summer, bypass the electric grid, embrace the natural power of the sun, and unlock the full potential of your seasonal harvest.


