Every gardener has that one spot—a stubborn, mossy, deeply shaded corner where the sun barely glances, weeds struggle to thrive, and traditional vegetables completely refuse to grow. For years, conventional landscaping advice has treated these damp, shadowy zones as dead spaces, recommending that you either cover them in gravel or abandon them entirely. However, in the world of ecological design and permaculture, these exact corners are not problems; they are massive opportunities.
While leafy greens and sun-loving tomatoes require intense solar radiation, there is an entire kingdom of life that breathes, grows, and thrives in dark, humid environments: the Kingdom of Fungi. By introducing edible mushrooms like Wine Caps, Oyster mushrooms, or King Stropharia into your garden’s shaded margins, you can transform an unproductive dead zone into a highly abundant gourmet food source.
But the benefits do not stop at the kitchen table. Beneath the surface, the fungal networks act as biological engineers, aggressively breaking down tough organic matter, filtering out environmental pollutants, and completely rejuvenating tired, compacted backyard soils. This comprehensive guide will explore how to select the right edible fungi, build high-yielding mushroom beds in the shade, and harness the power of mycelium to heal your garden from the ground up.
The Underground Engineers: How Fungi Heal Your Soil
To understand why mushrooms belong in your garden, you have to look beneath the fruiting caps and understand the true body of the fungus: the mycelium. Mycelium is a vast, subterranean web of microscopic, thread-like structures that weaves through the earth. When you plant fungi in your soil, you are introducing a dynamic, living filtration and fertilization system that transforms soil health through three primary mechanisms:
- Aggressive Organic Decomposition: Fungi are among the few organisms on Earth capable of breaking down lignin and cellulose—the tough, woody compounds found in woodchips, twigs, and fallen leaves. While bacteria struggle with these materials, mushrooms secrete powerful enzymes that melt them down, unlocking trapped carbon and nutrients and turning raw wood into rich, spongy, dark humus in a fraction of the time.
- The Mycorrhizal Highway: Many fungal networks form symbiotic relationships with the root systems of nearby trees and plants. They extend the reach of plant roots by up to a hundred times, channeling deep subterranean water, phosphorus, and essential micronutrients directly into your garden plants. In return, the plants feed the fungi carbon and sugars created via photosynthesis.
- Mycoremediation and Bioremediation: Mycelium acts as a natural, living filter (a process known as mycofiltration). As water passes through a mushroom bed, the dense mycelial mat physically traps pathogenic bacteria like E. coli, heavy metals, and urban runoff toxins, breaking down complex pollutants into harmless organic compounds before they can reach deeper groundwater layers.
Top Edible Mushroom Species for Shady Garden Corners
Not all mushrooms grow the same way. When choosing fungi for a shady garden corner, you should focus on saprophytic species—mushrooms that feed on dead organic matter and can be easily cultivated on woodchips, straw, or logs.
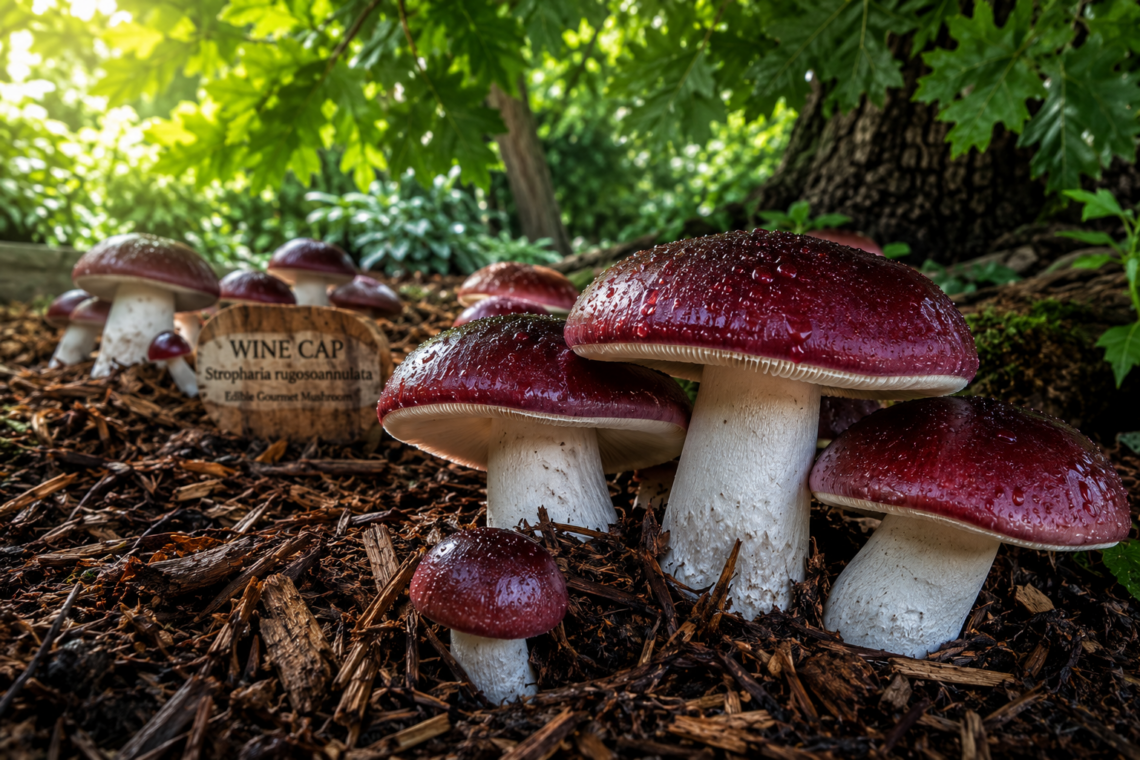
1. The Wine Cap (King Stropharia – Stropharia rugosoannulata)
Often called the “Garden Giant,” the Wine Cap is the absolute undisputed king of edible garden mushrooms. They produce massive, beautiful burgundy-colored caps with thick white stems that taste remarkably like premium choice earthy potatoes or asparagus.
- Best Substrate: Hardwood woodchips (maple, oak, birch) or clean wheat straw.
- Soil Benefit: They build incredibly thick topsoil, aerate heavy clay soils, and love growing alongside vegetables like zucchini, corn, and berry bushes.
2. Shimeji or Oyster Mushrooms (Pleurotus ostreatus)
Oyster mushrooms are incredibly resilient, fast-growing, and highly aggressive colonizers. While they are traditionally grown indoors in bags, they can easily be naturalized in shaded garden beds or on freshly cut logs buried vertically in the ground.
- Best Substrate: Hardwood logs, coffee grounds mixed with straw, or heavy leaf mulch.
- Soil Benefit: They excel at breaking down thick, stubborn mulch layers and transforming them into soft, nitrogen-rich organic soil.
3. King Oyster (Pleurotus eryngii)
Known for its thick, meaty, edible stem, the King Oyster enjoys slightly cooler, shaded areas and can tolerate being grown in soil patches rich in woody compost and straw.
- Best Substrate: Fermented sawdust or straw pellets buried in a shaded trench.
- Soil Benefit: They improve soil structure and water retention capacities in sandy soils by leaving behind a sponge-like network of dead mycelium that stores moisture.
Step-by-Step Guide: Building a Fungal Woodchip Bed in the Shade
Building a dedicated mushroom patch is incredibly simple and requires no specialized tools. The best time to start your bed is in early spring or late summer when the weather is mild and natural moisture levels are higher.
Materials Needed:
- Mushroom Spawn: 4 to 5 pounds of high-quality Wine Cap or Oyster sawdust spawn (available from online mycological suppliers).
- Substrate: A large pile of fresh hardwood woodchips (avoid cedar, cypress, or redwood, as these woods contain natural antifungal oils that will kill your spawn).
- Cardboard: Clean, unprinted brown corrugated cardboard boxes with all plastic tape and staples removed.
- Water: Access to a garden hose with a spray nozzle.
Installation Steps:
Step 1: Clear the Shady Space
Navigate to your chosen shady corner. Clear away any heavy weeds or aggressive grass, but do not till or disturb the underlying soil. Leave the soil flat; the natural compaction is fine, as the mycelium will drill through it organically.
Step 2: Lay the Cardboard Barrier
Moisten the ground thoroughly, then lay your brown cardboard sheets flat across the entire area, overlapping the edges by at least 6 inches. This cardboard serves two critical purposes: it suffocates any remaining weed seeds and acts as a pristine, moisture-locking base layer that the mushroom mycelium absolutely loves to eat. Soak the cardboard with water until it is completely saturated.
Step 3: The First Woodchip Layer
Spread a clean, 2-inch layer of your fresh hardwood woodchips directly on top of the wet cardboard. Spray this layer with water to ensure it is thoroughly damp but not muddy or waterlogged.
Step 4: Inoculate with Mushroom Spawn
Take your sawdust mushroom spawn and break it apart gently with your hands. Scatter the spawn evenly across the entire surface of the woodchips, much like putting cheese on a pizza. Use about half of your total spawn bag for this layer.
Step 5: Repeat the Lasagna Method
Add another 2-inch layer of woodchips directly over the spawn, water it deeply, and scatter the remaining half of your mushroom spawn. Finally, cover this with a final 2-inch top layer of woodchips to protect the delicate mycelium from direct air currents and ambient light. Spray the completed bed one last time.
Maintaining and Harvesting Your Fungal Paradise
Once your woodchip bed is built, maintenance is remarkably passive. The main goal is to ensure the interior of the bed remains damp. Check the patch once a week during hot dry spells by pulling back the top inch of woodchips; if it looks white and webby and feels like a wrung-out sponge, it is perfectly healthy. If it looks bone-dry, give it a deep, gentle watering.
Within a few months, you will see bright white, web-like mycelium completely enveloping the woodchips. Depending on when you planted, the first mushrooms will pop up after a heavy rain shower in late summer or autumn.
Harvesting Tips:
- Catch them early when the caps are still rounded and firm before they flatten out completely.
- Gently twist and pull the mushroom from the base rather than cutting it; this preserves the mycelial attachment in the bed.
- Always cook garden mushrooms thoroughly before eating to break down chitin walls and unlock their full nutritional and medicinal properties.
Long-Term Garden Transformation
As the seasons pass, you will notice a profound shift in that once-dead, shady garden corner. The hard, compacted, nutrient-poor soil beneath your mushroom bed will transform into a dark, crumbly, sweet-smelling earth teeming with earthworms, beneficial microbes, and rich humus.
Every year, simply toss a fresh layer of hardwood woodchips on top of the bed to feed the infinite hunger of your mycelium. In return, your garden will provide you with a lifetime of free, organic gourmet food while building some of the healthiest, most fertile soil on the planet.


